


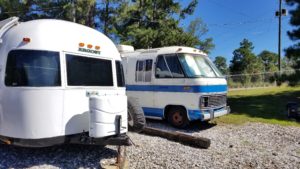
A couple of years ago, we painted our Argosy Trailer with Rustoleum Topside paint using foam rollers. It was a long process but the low cost was worth the effort. It cost a couple of hundred dollars to repaint the exterior of this trailer a Gloss White. It would have cost over $4k for a professional to paint our Argosy.
To review our post on how to Paint with Rustoleum Topside with FOAM ROLLERS, click here. Full How To with Detailed Pictures and Instructions including How To Prep Your Vintage Trailer for Painting.
Painting Our Argosy with Topside and Rollers
It took us a while to confirm what color we wanted the bottom of our Argosy. Keeping all white was also an option since the white was helping to keep our rig cooler during our Summer Camping months. Topside paint in Gloss White on the top makes the sun and heat bounce off the trailer. But the Argosys came with two colors off the factory line (cream on top, beige on bottom) so it made sense to give ours a two color look. The interior theme is a Fish Camp/Mission style with Black, Green and Orange being the main colors. Rustoleum..

Prep Work

Whether you are foam rolling or air spraying Topside Paint, Prep Work MUST be done to ensure the paint adheres correctly and lasts long term. There is no getting away without doing these steps. If you don’t follow these steps, you have 100% chance of massive flaking off of paint, if it even adheres at all.
- Fix any Dents and Dings before proceeding. Once you paint with Topside, ALL Dents and Dings WILL SHOW. The Paint is super glossy and shows everything. Notice our two ‘straight line’ dents on the Curbside? We inherited them.
- Wash the Entire Rig very well and leaving no soap residue. We used Krud Kutter since our Rig is parked outside 24/7/365.
- Lightly Sand everywhere you plan on painting (assuming it is not bare metal) and rinse off the dust.
- Tape over windows and light fixtures.
- Make sure the surface is prepped with Etching Primer on the bare metal. No paint will adhere if you do not have Etching Primer on bare metal!!! HINT: The top End Caps need Etching Primer.
- We then Primered all over and lightly wet sanded it smooth, again, to ensure no bumps, bruises, etc.
- The optimum outside temperature should be between 65 and 90 degrees.
Thinning the Paint

If using an Air Sprayer, we used one quart (4 cups) of Paint Thinner to three quarts of Topside Paint. The amount of paint thinner is different if Foam Rolling!

Our 28′ Trailer needed four quarts of Topside Paint. We used three quarts to Air Spray and needed the fourth quart to do touch ups and correct any drips. After letting the paint dry for 24 hours, we removed the plastic and painter’s tape. The paint had not cured completely (fingernail could still leave a mark) so no sanding for at least another week. At that time, we will lightly sand any drips and touch up with green paint with a foam roller.

Testing the Thickness 
Spraying Green 
Oh the Drips!!
Topside comes in many colors but they tend to be more basic. If you want to get more creative with the color, you can try Rustoleum’s Wet Edge but we can not attest to it’s usage since we have not used this product.
Rustoleum Wet Edge Paint
Foam Roll or Air Spray?


For us, this was a no brainer: Air Spray! Why? Because it did not take the minimum of three coats with wet sanding in between. BUT, we did paint over those three coats with the Air Sprayer so we had a solid base underneath our green Topside paint.
It took us over a week to Foam Roll with the necessary wet sanding in between. Even with three people foam rolling, it look most of the day to get one coat on.
With the Air Sprayer, we just did one coat (probably slightly thicker than needed) with zero wet sanding since our bottom white coat was in decent shape (after years of being outside 24/7/365). It took us over two hours to tape everything up but only 20 minutes to air spray. Winner Winner Chicken Dinner!
Foam Rolling allows the Topside Paint to self level. Air Spraying does not self level.
It takes a minimum of a week for this paint to cure. Two is preferred before you travel to avoid tiny road dents. If you want to do a second coat, you will need to wait at least a week if you want to lightly sand any drips, oops or flying bugs memorialized in paint.

Final Thoughts….
- We have used Spray Paint, Topside Paint and Tractor Paint from Tractor Supply. All have worked well but it would cost a fortune to use Spray Paint.
- If you like the colors that Tractor Supply offer and find it on sale, it’s a bargain! Otherwise, we found that most hardware stores do not stock Topside and you will have to buy it from Amazon.
- We prefer Air Spraying. A lot of DIY’ers get a cheap Air Sprayer from Harbour Freight. We bought ours from Amazon on a lightening Deal. Don’t overthink this one… just buy a reasonably priced one, not a crazy expensive one.
- Foam Rolling gives you more control but takes A LOT of work. I’m happy we did the foam roller route the first time around. It made me appreciate the 20 minutes total spent on Air Sprayer (and another 20 cleaning the darn thing).
- If you Foam Roll….. You have to use a FOAM Roller. This might seem intuitive but some have not understood the difference between a FOAM roller and the regular NAP roller. A Nap Roller WILL LEAVE THE DREADED ORANGE PEEL!
- Most importantly, your final coat will only look as good as your base. Prep well. Sand to perfection. Take your time painting.

Spray Painted 
Topside Paint 
Tractor Paint


Hi there! Looks amazing and we are inspired. What type of sander did you use?
Hi! When we just used a foam roller (no air sprayer) for the white paint, we used an orbital sander with 80 grit sandpaper, first, then immediately after followed with 220 grit before ANY painting. In between coats, we used only the 220 grit.
When we air sprayed (just the green paint) and got a couple of minor drips, we used 220 grit with the orbital sander. The last step was to use 400 grit just to smooth, which gets the paint cloudy,followed by a polishing compound with a power buffer to get that gorgeous shine.
A lot of work but once it’s done, it looks great!
Hello- amazing job on your project. We recently bought 28 foot 1977 just like yours. Your tutorial on the paint is awesome. I am very glad we found you online because we are going to be painting ours in spring time. However we tore out the steps from ours because they are downright horrible- Where did you find your steps? They appear to be perfect.
Trevor –
My apologies for the delay in responding! We took a break over the holidays.
We bought our steps from Wayfair. Try searching their site for “spa steps.” At the time, Wayfair had the best price. We love them because it makes it easier for our pups and teen to get in and out of the trailer. We also can sit on the top step without any concern of them collapsing in. Easy to clean too.
Great job and walk through – thanks!
If you were starting from scratch, would you foam roll the primer and then spray the topside?
Thanks Brett!
I would definitely spray the Primer (and then Top Side) and not foam roll. It is SO much quicker to air spray. Originally, we thought the foam roller would give us more control. Nope.
You will get a smoother coat by doing both with the air sprayer. Definitely practice many times on a scrap of wood before spraying on your trailer to ensure correct consistency. Everything from temperature to brand of paint is different from project to project with an air sprayer.
The Prep and Taping Off is truly where the most time is spent on this DIY Project.
Good luck!